February 6, 2026
How Do I Choose an Acrylic Mahjong Set?
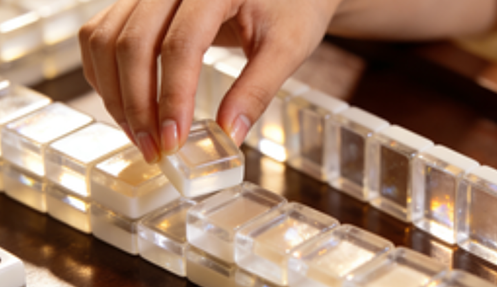
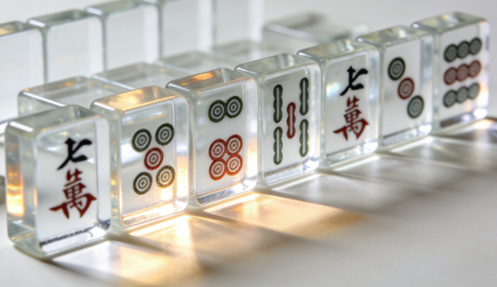
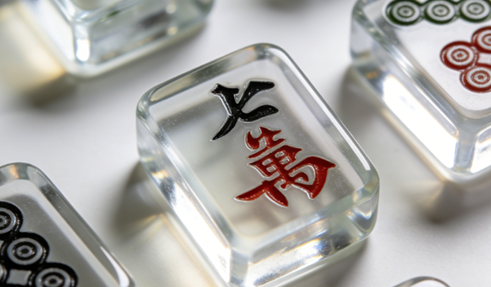
Choosing an acrylic mahjong set isn’t just about picking a modern-looking alternative to traditional tiles. The material, finish, size, and manufacturing quality all influence how the set feels in play, how it holds up over time, and how enjoyable it is to use day after day. From material grade and edge finishing to customization options and long-term durability, understanding these details can help you avoid common pitfalls and choose a set that truly fits your style of play. This guide breaks down what matters most—based on real-world experience—so you can make a confident, informed choice. Why Choosing the Right Acrylic Mahjong Set MattersA well-made acrylic mahjong setcan enhance both the look of the table and the overall feel of play. Many players choose acrylic for its sleek, modern finish and the creative freedom it allows—richer colors, polished surfaces, and even clear or translucent“crystal”effects that traditional materials don’t easily replicate. But a set worth buying goes beyond aesthetics: it should also feel comfortable in the hand, keep tile sizes consistent for smooth stacking, and maintain a clean finish through frequent shuffling and everyday use. Material & Quality: The Foundation of a Good Mahjong Set Acrylic1.Cast vs. Extruded Acrylic (PMMA)When choosing an acrylic mahjong set, it’s worth starting with the acrylic grade. Cast PMMA is usually the more premium option because it feels denser, stays more stable in shape, and generally tolerates repeated handling better over time. It also tends to maintain clarity well, which is especially important for clear, translucent, or light-toned tile styles. Extruded acrylic is more common in lower-priced sets; it can be fine for casual use, but it’s typically less dense and may show wear sooner around corners and other high-contact areas. If you want a set that keeps its look and feel longer, cast PMMA is often the safer choice. 2.Thickness, Weight & SoundAfter confirming the material, focus on thickness and weight, since these directly affect how the tiles handle. Many well-made sets sit around 2.5–3.5mm, offering a solid feel without becoming bulky or awkward. Ideally, the tiles should feel steady in your hand, stack cleanly, and avoid that hollow, lightweight sensation. A quick reality check is sound: tap two tiles together—better acrylic often produces a clear, bright “ping,” while cheaper plastic blends tend to sound duller and more muted. 3.Engraving vs. Surface PrintingNext, look at how the symbols are applied, because that determines how well the design holds up with regular play. Deep engraving is typically the most durable option since the markings aren’t just on the surface, making them less likely to fade with frequent handling. Printing can also be reliable when it’s done with strong contrast and a fade-resistant method. In either case, the goal is simple: crisp, consistent markings that remain easy to read across the full acrylic mahjong set, even after months of use. Size and Handling Guide for Acrylic Mahjong Tiles1.Tile Size: Readability vs. PortabilityTile size can quietly shape how enjoyable your acrylic mahjong tiles feel in daily play. Larger tiles (around 30mm+) are easier to read quickly, which fits relaxed home games and anyone who prefers clearer, more comfortable visibility. They also tend to feel a bit more substantial in the hand. Smaller tiles are easier to carry and store, making them a smart option for travel or tight spaces—though the markings can feel more compact, and visibility may drop in softer lighting. 2.Edge Finishing & GripEdge work is one of those details you only start to appreciate after you’ve played for a while. A light chamfer—around a ~0.3mm bevel—usually hits the sweet spot: it softens the corners so they don’t press into your fingers, while still giving you enough grip for confident stacking and shuffling. Edges that are too sharp can feel tiring over time, and corners that are overly rounded may start to feel a bit slippery when you’re moving tiles quickly. This is also where manufacturing quality really shows. With Symphony Acrylic, edge finishing isn’t treated as an afterthought—corners are refined through a controlled process that can include heat-bending (thermal forming) and polishing to smooth out sharp transitions and improve consistency from tile to tile. The result is a set that feels more comfortable in long sessions, with edges that move cleanly in the hand and a grip that stays reliable without feeling harsh. Acrylic Mahjong Set Durability: Long-Term Use and Care1.What Holds Up Over TimeFrom real use, a good mahjong set acrylic can stay looking clean for years, even if it’s played weekly. Premium acrylic usually keeps its shape, and the tiles don’t “soften” at the corners the way cheaper sets sometimes do. The difference tends to show up in the details: well-made tiles keep sharp-looking edges and a clear surface, while lower-grade acrylic can chip at high-contact points—especially corners—or start to look slightly cloudy where tiles knock together repeatedly. In practice, most complaints come less from acrylic as a material, and more from inconsistent cutting and finishing on budget sets. 2.Maintenance & CareDaily care is simple—most of the time, a soft cloth and a little mild soap are enough to remove fingerprints and table residue. What really affects long-term appearance is how the tiles are handled between games. Acrylic can pick up fine scuffs more easily, particularly on glossy or transparent styles, and those marks often come from storage and transport rather than gameplay itself. Keeping tiles in a lined case, using separators, and avoiding gritty surfaces (like dusty shelves or unlined bags) makes a noticeable difference. With those habits, an acrylic set can stay polished and “photo-ready” far longer than people expect. Design, Customization & Aesthetic Value1.Color & Transparency OptionsAcrylic stands out largely because it gives you more control over the look of the set. An acrylic mahjong set can be made with vivid, saturated colors and strong, high-contrast markings that stay easy to recognize during play. At the same time, acrylic also supports finishes that are hard to achieve with traditional materials—clear, translucent, and crystal-style effects that feel clean, modern, and display-worthy. Your finish choice matters here: glossy surfaces tend to look more “jewel-like,” while matte finishes can reduce glare and keep attention on readability. 2.Custom Acrylic Mahjong SetsCustomization is where acrylic really stands out, because you can make a set feel personal and distinctive without losing a clean, premium look. A custom acrylic set can include subtle branding, monograms, themed artwork, or carefully chosen colorways—details that turn it into something more than a standard game set. What often matters most, though, is consistency. It’s one thing to create a beautiful first batch, but it’s just as important that future runs match the same shades, markings, and overall finish. Symphony Acrylic is built around that kind of repeatable precision—through accurate cutting, refined edge finishing, and dependable color matching—so the set you reorder still looks cohesive, polished, and true to the original design. Choosing a Trusted Acrylic Mahjong Set Manufacturer1.Why Manufacturing Experience MattersWhen you’re choosing a mahjong set acrylic, the factory behind it often determines whether the set feels“premium”in real use—or just looks good at first glance. An experienced manufacturer can usually verify the material grade (for example, cast PMMA rather than mixed plastics) and keep tighter control over the details that affect play. That shows up in simple, practical ways: uniform sizing so tiles align cleanly when building walls, smooth finishing so shuffling feels comfortable, and edge refinement that helps reduce corner wear from repeated contact. A reliable maker also keeps the set consistent overall, so the tone of the acrylic, the sharpness of the markings, and the thickness don’t vary from tile to tile. 2.Symphony Acrylic as a Reference CaseSymphony Acrylic is a useful reference for what many buyers look for in a high-quality acrylic mahjong set: stable material selection, clean edge work, and repeatable finishing standards that keep the design cohesive. The benefit is a set that looks intentional—clear, modern, and well-presented—while also feeling consistent in hand, with tiles that handle smoothly and stay visually “matched” as a complete set over time. ConclusionWhether you’re choosing a set for regular home play, a gift, or a custom design project, paying attention to these fundamentals makes a real difference. With a quality-focused approach like that of Symphony Acrylic, it’s possible to enjoy the visual freedom of acrylic while still getting a set that feels cohesive, comfortable, and reliable every time it’s on the table.
February 6, 2026
What Is the Difference Between Melamine and Acrylic Mahjong Tiles?
In this guide, we break down the real differences between melamine and acrylic mahjong tiles, drawing on practical play experience to help you decide which material best fits your needs. What Are Melamine Mahjong Tiles?Melamine mahjong tiles are usually made from a thermosetting resin that hardens into a compact, rigid material. After curing, the tiles stay structurally stable and are unlikely to warp under normal temperature changes. Over time, melamine also tends to stand up well to everyday wear, with good resistance to light scratching—so the surface finish and tile edges generally remain neat and well-defined. At the table, what most players notice first is the weight and solidity. Melamine tiles feel more substantial in the hand, which can make stacking, shuffling, and moving tiles around the table feel steadier. When the tiles touch, they produce a crisp “clink” that many players associate with a more traditional, satisfying mahjong rhythm—one reason melamine remains popular in long-standing groups and more serious play. From a practical standpoint, melamine is a strong fit for frequent use, whether it’s regular home sessions or club environments where tiles are handled, stored, and transported repeatedly. If you’re looking for a set with a classic appearance and a truly solid feel—rather than a purely decorative or design-forward look—melamine is often the material that delivers that experience. What Are Acrylic Mahjong Tiles?Acrylic mahjong tiles are made from PMMA (acrylic)—a thermoplastic appreciated for its clarity, smooth hand-feel, and design flexibility. Because PMMA can be precisely cut and polished to a clean, glossy finish, it’s widely used in modern sets, ranging from simple minimalist styles to more eye-catching “showpiece” designs that look especially sharp in photos and on display. Unlike many traditional opaque materials, acrylic also allows for clear, translucent, or crystal-style effects, giving the tiles a more contemporary and premium visual identity. That visual appeal carries into the playing experience as well. Acrylic tiles are generally lighter than melamine, which many players find more comfortable during long sessions and easier to handle when moving tiles quickly. Of course, the feel depends on craftsmanship: when dimensions are consistent and edges are carefully finished, acrylic feels smooth and controlled, not flimsy or “too light.” With Symphony Acrylic, the focus is on refined finishing—clean edge work and accurate shaping—so tiles stack neatly and shuffle smoothly, whether you play by hand or use an automatic table. Another reason acrylic stands out is how naturally it supports color, customization, and branding. It takes vibrant palettes and crisp markings beautifully, making it ideal for custom projects such as branded collections, limited editions, gift-ready sets, or club programs that need a consistent look. Symphony Acrylic offers flexible customization and coordinated presentation options, which helps keep designs consistent across batches—especially valuable for reorders and long-term B2B supply. Finally, a practical note on durability: lower-grade acrylic can be more prone to edge chipping, but high-quality acrylic mahjong tiles address this through better raw materials and more controlled finishing. Symphony Acrylic emphasizes precision processing and polishing, and can provide optional surface-protection choices for customers who want extra durability over time. Key Differences Between Melamine and Mahjong Sets Acrylic (Comparison Table)FeatureMelamine Mahjong TilesAcrylic Mahjong TilesWeight & FeelHeavier, denser, solidLighter, smootherDurabilityExtremely durable, scratch-resistantDurable (quality-dependent), lower-grade may chipAppearanceOpaque, classic, traditionalBright, modern, translucent or transparentSoundCrisp, satisfying “clink”Softer soundCustom DesignLimitedHighly customizableCostOften budget-friendly, premium sets can be costlyVaries widely by quality Real-World Durability: Acrylic Mahjong Tiles vs. Melamine Over Time1.Wear and Tear Over TimeIn real-world, high-frequency play, melamine tiles are known for staying consistent year after year. Their dense, rigid build helps them hold a sharp shape and clean edges, even after countless rounds of shuffling, stacking, and storage. That “solid and steady” feel is a big reason melamine remains a go-to choice in clubs and in homes where mahjong is played regularly. Acrylic tiles can be equally reliable when they’re made from premium PMMA and finished with care. Well-made sets keep a smooth surface and consistent sizing through everyday use. Where problems usually appear is in lower-grade acrylic—repeated contact can lead to small corner chips or a slightly cloudy look at the edges. That’s why Symphony Acrylic places more attention on finishing details like edge treatment and polishing: when corners are properly refined, acrylic holds up better in the exact areas players touch and handle the most. 2.Maintenance & CleaningFor daily upkeep, both melamine and acrylic are easy to clean. A quick wipe with a soft cloth and mild soapy water typically removes dust, fingerprints, and table residue. The main thing is to stay gentle—avoid abrasive pads or strong cleaners, since they can dull the surface over time. One difference is that acrylic tends to reveal fine marks more readily, especially in glossy or transparent styles where light reflections are stronger. Small scuffs can be more noticeable than on opaque tiles, but they’re also easy to minimize with good habits. If you’re using a design-forward set—like the clear, high-gloss look often associated with Symphony Acrylic—simple routines such as careful storage, keeping tiles away from gritty surfaces, and wiping with a soft cloth can help the set stay polished and photo-ready for years. Sound & Sensory Experience During Play: Mahjong Acrylic Sets vs. Melamine1.Why the“Clink”Matters to PlayersFor many players, mahjong isn’t only about what you see on the table—it’s also about what you feel and hear. The steady rhythm of shuffling, stacking, and placing tiles sets the mood of the game, especially for those who learned with traditional sets. A bright, satisfying“clink”adds a sense of momentum and presence, turning routine actions—mixing tiles or building walls—into something unexpectedly enjoyable. Over time, that sound becomes part of how people judge a set: when the tiles respond consistently, the whole game feels more“right.” 2.Acrylic vs. Melamine Sound ComparisonIn general, melamine produces a sharper, more defined clink because the material is denser and tends to “snap” more clearly when tiles touch. Mahjong sets acrylic usually sound softer and more muted—especially in high-gloss or crystal-style finishes where the contact between tiles feels smoother. For many players, that difference is a reasonable trade when the priority is visual appeal. Some even prefer acrylic for home use because it’s less intrusive in apartments or shared spaces. This is also where Symphony Acrylic fits naturally: it’s often chosen for design-forward sets that aim for a premium look, with a playing experience that feels polished and refined rather than loud and traditional. Cost Considerations: Is Acrylic or Melamine More Expensive?1.Price Ranges in the MarketPricing depends a lot on how the tiles are made, but the market follows a fairly clear pattern. Entry-level melamine sets are usually more budget-friendly while still offering solid durability, which is why they’re often chosen for everyday play. High-quality acrylic sets typically cost more—not simply because of the material, but because premium acrylic is often paired with more time-intensive finishing. Steps like precision cutting, cleaner edge work, multi-stage polishing, and optional customization all add to production effort. As the look becomes more refined—think high-gloss surfaces, crystal-clear styles, or detailed markings—the amount of finishing and quality control increases, and the price tends to rise with it. 2.Value for Different BuyersIf you’re buying for clubs, frequent play, or long-term use, melamine often delivers the best value: it’s reliable, consistent, and built for repeated handling. On the other hand, if the goal is a set that feels more premium in presentation—such as for gifting, branding, or modern interiors—mahjong acrylic sets usually make more sense. Acrylic offers more flexibility in color, finish, and overall style, helping a set stand out visually rather than blending into the standard“utility”look. This is also where design-focused options like Symphony Acrylic are commonly chosen: the value comes less from being the cheapest, and more from achieving a distinctive look that matches a brand, a space, or a special occasion. ConclusionThe right choice ultimately depends on how and where you play, and what you value most: long-term consistency or visual expression. With carefully made options like Symphony Acrylic, high-quality acrylic tiles can balance aesthetics with reliable performance, making them a compelling alternative to traditional materials when design matters as much as play.
January 23, 2026
What is the Best Material for a Mahjong Set?
Below, we’ll walk through the key factors that shape the playing experience, compare the most common mahjong tile materials, and explain why acrylic (PMMA) has become a standout choice for modern home games, gifting, and branded sets. Why Mahjong Set Material MattersSeven Factors That Shape the Playing Experience1.Feel & Grip (edges, bevels, tolerances)Great tile “feel” is all about the small things: how the edges are finished (sharp vs. gently beveled), how smooth the surface is, and whether every tile is truly uniform in size. When tolerances are tight, tiles stack cleanly and shuffle without catching—so the whole game feels more effortless and precise. 2.Sound & Shuffle Feedback (clink vs. thud)Material also changes the sound and feedback you get when washing tiles. Some sets give you a crisp, satisfying clink, while others are quieter with a softer thud. That sound may seem minor, but for many players it’s part of the enjoyment—and often a cue of quality. 3.Readability (contrast, glare, lighting)Clear markings help you play faster and avoid misreads. Contrast matters, but so does the surface finish: warm indoor lighting, daylight, and glossy tables can all affect visibility. The best sets stay easy to read even when lighting isn’t perfect. 4.Durability & Everyday Wear (chips, cracks, scratches, fading)A good set should still look sharp after years of play. Depending on the material, you may see corner chips, tiny cracks, cloudy micro-scratches, or colors that fade over time. If you play often—or bring your set to friends’ houses—durability quickly becomes a top priority. 5.Cleanability (oil, spills, disinfecting wipes)Tiles naturally collect skin oils and snack residue, and spills happen—tea, soda, even sauce. Materials that wipe clean easily (and don’t hold grime in pores or seams) are simply more practical, especially for shared sets or frequent sessions. 6.Weight & Stability (building walls, stacking, auto-table fit)Weight affects how stable tiles feel when building walls and setting up hands. Heavier tiles tend to stay put and feel more substantial; lighter tiles can shift more easily. Size and weight also matter if you use an automatic table, since compatibility can vary by model. 7.Aesthetics & Customization (color, transparency, backs, engraving)Finally, material shapes how the set looks—and how far you can personalize it. This is where you’ll notice the biggest differences: opaque versus translucent styles, modern colorways, custom backs, engraved symbols or logos, and overall presentation that feels gift-worthy. The “Best” Material Depends on How You’ll Use It1.High-frequency home gamesGo for comfort, easy readability, and simple wipe-down care—especially if you play weekly or host friends regularly. 2.Clubs & community playLook for consistency and toughness: tiles that stack evenly, hold up to heavy use, and stay easy to read across different players and lighting. 3.Commercial venues (hotels, cruise ships, lounges)Durability and quick cleaning matter most here—plus a premium look that holds up under ambient lighting. If you can add branding or a custom design, even better. 4.Teaching & cultural programsPrioritize beginner-friendly visibility: high-contrast markings, straightforward recognition, and a set that can handle frequent handling and repeated setup. 5.Gifting & collectingIn this case, presentation is part of the value. Choose a material that looks distinctive, feels well-made, and offers customization for a more personal, memorable gift. Common Mahjong Set Materials1.Acrylic (PMMA)A mahjong set acrylic is a popular pick if you want something that looks modern and feels “premium” without trying too hard. Because PMMA is naturally clear, tiles can be made transparent or translucent, dyed in bold or soft tones, and finished with engraved or carved markings that stay sharp and clean-looking. In practice, this makes acrylic mahjong tiles a great fit for gifting, branded sets, and home game nights where you want the set to look just as good on a shelf as it does on the table. 2.Melamine (Melamine Resin)Melamine is often chosen for a more classic, no-nonsense feel. It tends to be dense and cool to the touch, and it usually creates that familiar, crisp “clink” when you wash the tiles—something many players associate with traditional mahjong. If you prefer a set that feels solid, stable, and closer to what you’d find in long-established playing circles, melamine is a safe, reliable choice. 3.Other Plastics (ABS / PP / PS, etc.)“Plastic” can mean a lot of things, so quality varies more here than with most other materials. PS (polystyrene) is common in lower-priced sets, but it can show wear earlier and may feel lighter or less refined over time. PP/PE often have a slightly softer, more “waxy” feel, and the sound during washing is usually quieter—more of a muted thud than a bright clink. These sets can be perfectly fine for casual games, travel, or as a backup, but it’s worth paying attention to finishing and consistency because the experience isn’t as standardized. 4.Wood/Bamboo, Ceramic, Jade/Stone (Niche or Collectible)Wood and bamboo sets bring a natural, cozy look and are often bought for décor, light use, or beginner-friendly play, but they can be more affected by humidity and long-term wear. Ceramic and jade/stone sets are typically more about collecting and display: they’re heavier, visually striking, and usually more expensive, with extra care needed for storage and handling. These are best when the goal is statement-piece appeal or occasional special sessions—rather than everyday, high-frequency play. Mahjong Set Material ComparisonMaterialLookFeel / SoundDurabilityCleaningCustomizationBest ForAcrylic (PMMA)Clear, premium; transparent/translucentSmooth edges; stable stacking; can be quieterGood (hard-coat optional)Excellent (wipe-clean)Very highPremium home, gifting, venues, branded setsMelamineOpaque, classicHeavier; crisp clinkExcellentGoodMediumTraditional feel, heavy usersABS / PP / PEBasicPP/PE softer, muted thudMediumMediumMediumBeginners, budget, travelWood / BambooNaturalMuted; humidity-sensitiveMediumFairLowKids, teaching, décorCeramic / JadeCollectibleVery heavyVaries (chip risk)FairLowDisplay, collectors Why Acrylic Mahjong Sets Stand Out1.Premium Clarity: Optical-Grade PMMAWith Symphony Acrylic, each acrylic mahjong set is made from optical-grade PMMA, then precision-cut and hand-polished for a clean, high-gloss finish. The result is a naturally clear look that works beautifully for transparent or translucent styles—making the tiles feel elevated, gift-ready, and easy to show off without looking overly flashy. 2.Better Handling: Precision + Smooth EdgesA set can look great and still feel “off” if the tiles aren’t consistent. Symphony Acrylic focuses on in-house finishing and tight tolerances, so tiles tend to stack more evenly and feel more uniform in hand. The micro-beveled edges also help the tiles glide during washing and reduce sharpness at the corners—small details that make long games more comfortable. 3.Crisp Markings: Deep Engraving + UV-Stable FillFor many players, readability is what separates a premium set from an average one. Symphony Acrylic uses deep engraving with UV-stable color filling, which helps the symbols stay crisp and clear over time. Combined with high-contrast artwork, the tiles remain easy to recognize even under mixed lighting—whether you’re playing at home, in a club, or in a brighter venue space. 4.Easy Personalization: Colors, Backs, Bilingual OptionsOne of the biggest reasons people choose acrylic mahjong tiles is the design freedom. Symphony Acrylic supports custom colorways, icon styles, logos or monograms, custom backs, and bilingual legends—so the mahjong acrylic set can feel personal without becoming a one-off that can’t be reproduced. That’s especially useful for clubs, programs, and brands that want consistent reorders later. 5.Built for Real Life: Wipe-Clean + Camera-FriendlyIn shared spaces, the best set is the one that stays presentable with regular use. Symphony Acrylic positions its tiles as wipe-clean and visually clear—practical for frequent handling, and also great when photos or videos are part of the experience. If you want a mahjong set that plays well and looks polished on the table, acrylic tends to check both boxes naturally. ConclusionChoose based on your playing environment, frequency, and priorities, and you’ll end up with a set that feels great every time you sit down to play.
January 15, 2026
Do Printed Designs on Acrylic Mahjong Tiles Peel Off?
Do the designs on acrylic mahjong tiles peel over time? The answer depends less on the material itself and more on how the tiles are designed and manufactured. From printing methods to construction quality, several factors determine whether a mahjong set will maintain its appearance after years of regular play. This article explores why some acrylic mahjong tile designs peel, what factors affect long-term durability, and how to identify well-made tiles that are built to last. Why Some Acrylic Mahjong Set Designs PeelSome acrylic mahjong tiles show peeling or wear because their designs are created using surface or UV printing, where the ink sits on the outermost layer of the tile. With regular play, constant shuffling and stacking gradually wear against these exposed graphics, causing them to scratch, fade, or eventually peel. In lower-cost manufacturing, durability can be further reduced by thin laminated layers and weak bonding, which may lead to separation over time. For this reason, these problems are most often seen in inexpensive, mass-produced mahjong sets that focus on keeping costs low rather than ensuring long-term quality and performance. Factors Affecting Durability of Acrylic Mahjong Tiles1.Printing MethodThe way a design is applied plays a major role in how well an acrylic mahjong tile ages over time. Engraved and filled designs are generally considered the most reliable option, as the characters are carved directly into the acrylic instead of being printed on the surface. After engraving, the recessed areas are filled with UV-stable, heat-cured color, allowing the markings to stay sharp and readable even after years of regular shuffling and stacking. This approach is commonly used by premium manufacturers such as Symphony Acrylic, where long-term clarity is treated as a core design standard rather than an afterthought. By contrast, surface or UV printing places ink on the outermost layer of the mahjong set acrylic. While this can look crisp when new, the design is exposed to constant contact during play. Over time, repeated friction can lead to fading, scratches, or peeling, especially in high-use environments. For players who value longevity, surface-printed designs are typically a less durable choice. 2.Construction QualityDurability depends not only on how the design is made, but also on how the tile itself is built. mahjong sets acrylic produced with single-layer acrylic or thin laminated construction are more prone to warping, separation, or uneven wear as they age. Minor inconsistencies in thickness or bonding may not be obvious at first, but they tend to become more noticeable with frequent handling. Well-crafted mahjong sets acrylic place strong emphasis on material quality and manufacturing precision. Using optical-grade acrylic, precise cutting, and careful polishing helps ensure each tile remains flat, balanced, and consistent. At Symphony Acrylic, in-house production allows closer control over these details, resulting in more stable stacks and a smoother, more uniform feel during play. 3.Ink & Surface ProtectionInk formulation and curing methods also influence how long a design maintains its appearance. Standard inks may gradually degrade when exposed to repeated handling, light, or temperature changes. Higher-end sets use UV-resistant pigments combined with heat-curing processes, which help colors remain stable and securely bonded within engraved areas. In settings where tiles are used heavily, additional protection can make a meaningful difference. Hard-coat surface treatments, available on select Symphony Acrylic sets, provide added resistance to scratches and abrasion while preserving the natural clarity and tactile quality of the acrylic. 4.Tile Type & Use ScenarioDifferent mahjong sets are designed with different types of use in mind. Lightweight plastic or lower-cost tiles are often intended for casual or short-term play, where convenience and affordability matter more than long-term durability. With regular use, these sets tend to show wear relatively quickly. By comparison, custom and high-end acrylic mahjong tiles are built for frequent handling, longer sessions, and extended ownership. Whether used in clubs, competitive play, as premium gifts, or in personal collections, Symphony Acrylic tiles are designed to maintain their appearance, consistency, and performance over time. How to Avoid Peeling When Buying Mahjong Acrylic SetsTo minimize the chance of peeling, it’s helpful to begin with how the design is created. Mahjong acrylic sets with engraved markings tend to be far more durable than those with designs printed only on the surface, since the details are set into the tile itself rather than resting on top. Color treatment also plays an important role—UV-stable or heat-cured finishes are better suited to regular play and are more likely to retain their appearance over time. Beyond the design, overall construction makes a difference as well. Tiles made from higher-grade or layered acrylic generally offer greater stability and resistance to wear. For custom orders, working with a manufacturer that can maintain consistent quality across multiple production runs helps ensure that future reorders match the original set in both look and feel. Why Our Mahjong Set Acrylic Doesn’t PeelAt Symphony Acrylic, long-term durability begins at the manufacturing stage. Rather than applying designs to the surface, each tile is made with deeply engraved legends that are cut directly into the acrylic itself. These recessed details are filled with UV-stable, heat-cured color, allowing the markings to withstand repeated shuffling and handling without losing clarity over time. The choice of material is equally important. We work with optical-grade PMMA acrylic, selected for its structural stability and resistance to aging or distortion. Paired with precise manufacturing tolerances, this helps ensure consistent stacking and smooth movement during play, minimizing unnecessary contact between tiles. For settings that demand extra durability, optional hard-coat finishes offer additional protection against everyday wear while preserving the natural look and feel of the acrylic. Equally critical is process control. By keeping production in-house, Symphony Acrylic maintains uniform engraving depth, accurate color application, and a consistent tactile experience across all batches. This approach ensures that every set—whether an initial order or a future reorder—meets the same standards for appearance, performance, and longevity. ConclusionNot all acrylic mahjong tiles are created equal. While peeling and wear are common in lower-cost sets that rely on surface printing and lightweight construction, these issues are not inherent to acrylic as a material. Factors such as engraving depth, ink treatment, material quality, and manufacturing precision all play a critical role in long-term performance.
December 26, 2025
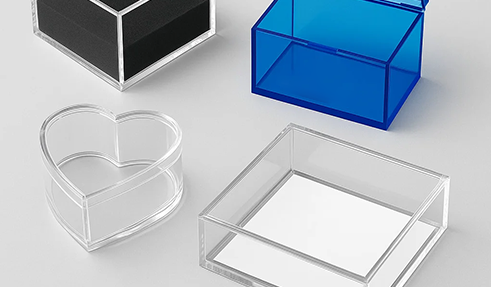
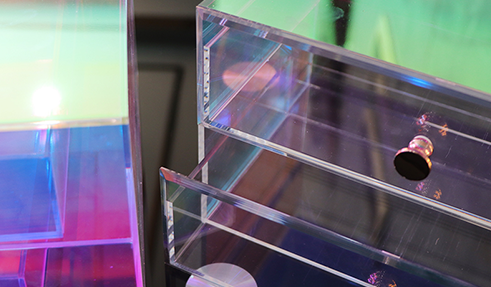
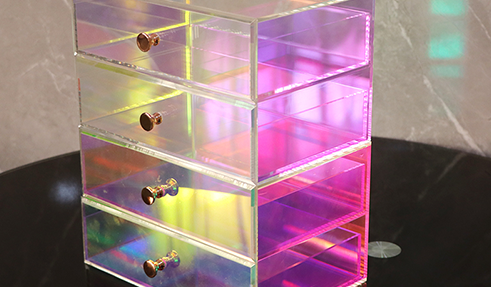
What Are the Features of Acrylic Display Cases?
Below, we’ll break down the features that make acrylic display cases so versatile—and how they help you create a cleaner, safer, more premium display. We’ll also share common use cases, so you can quickly choose the right options (UV, lighting, locks) for your needs. Exceptional Clarity and Visibility in Acrylic Display Case BoxesOne reason acrylic display case boxes work so well is that they almost “disappear,” letting the item inside take center stage. Acrylic is highly transparent, so the display stays bright and easy to view from multiple angles. Another subtle advantage is how the edges look: thicker glass can sometimes show a faint green cast, while acrylic edges often appear cleaner, which helps the whole case feel lighter and more open. That clarity is especially valuable when you’re showcasing fine details—like collectibles, jewelry, models, or other premium pieces. Durability and Safety Benefits of Display Acrylic CasesA big advantage of display acrylic cases is how well they handle everyday bumps and handling. Acrylic absorbs impact better than glass, so a nudge from a shopping cart, a crowded booth, or an accidental knock at home is much less likely to turn into a shattered panel. And if acrylic does fail, it typically cracks rather than breaking into sharp shards. That reduces cleanup risk and makes it a safer choice for high-traffic settings like retail counters, trade shows, and public displays. It’s also a practical option for homes with kids or pets—especially when the case sits on lower shelves or in areas where it may get bumped during normal activity. Lightweight and Easy Handling in Clear Acrylic Box Display CasesOne of the most practical reasons people choose acrylic display cases is that they’re simply easier to live with. Acrylic is much lighter than glass, so shipping is more straightforward, carrying it upstairs is less of a hassle, and adjusting your display layout doesn’t instantly become a two-person job. That benefit matters even more as the case size increases. Larger panels are easier to lift and place, and wall-mounted or elevated displays put less strain on brackets, anchors, and shelving. Day to day, a lighter case is also easier to control when you’re wiping, opening, or relocating it—so there’s less chance of accidental bumps that scuff edges or nick corners. Customization and Design Flexibility for Clear Acrylic Box Display CasesAcrylic is a strong option when you want the case to feel truly tailored—not “almost right.” With clear acrylic display cases, you can dial in the exact dimensions and thickness, then choose a format that fits your space: tabletop for counters, wall-mounted for vertical displays, freestanding for retail floors, or stackable designs for collections that keep expanding. The flexibility goes beyond size. Depending on how you use the case, you can add magnetic or hinged doors, build in tiered platforms for better viewing angles, include cable pass-throughs for electronics, or design the layout to work with lighting. On the visual side, details like clear vs. colored bases, mirrored bottoms, and logo branding help the case match the item and elevate the overall presentation. UV Protection Options in Acrylic Display CasesIf you’re displaying anything light-sensitive, it’s worth thinking about UV protection from the start—because the change is slow, and once fading shows up, it’s usually there to stay. Many acrylic display cases can be made with UV-filtering sheet stock or paired with UV-reducing coatings that help limit the exposure that causes fading, yellowing, and loss of color depth. This is especially important for artwork, documents, textiles, signed pieces, and printed collectibles, where inks and dyes can gradually lose richness and start to look flat under sunlight, spotlights, or strong indoor lighting. The good news is that UV protection doesn’t take away from the display itself. You still get the clear, bright look acrylic is known for—just with an extra layer of protection working quietly in the background. It’s a smart upgrade if the case will sit near a window, stay under display lights for long hours, or be used in retail spaces where lighting runs all day. Protection and Security Features for Clear Acrylic Display CasesA display case isn’t only about presentation—it’s about keeping an item in good condition with less day-to-day effort. A fully enclosed clear acrylic display case helps keep dust and airborne particles off the surface, and it creates a clear boundary that reduces casual touching. That matters because the “maintenance” most people do—wiping, handling, adjusting—often becomes the main source of fingerprints, fine marks, and gradual wear over time. For higher-value pieces, security features make the case more practical in shared or public settings. Lockable doors add a layer of deterrence in retail, exhibitions, offices, and showrooms, and they offer peace of mind when the display isn’t constantly supervised. Just as useful, a well-designed case keeps things organized: each item has a dedicated, protected space, so long-term display and storage feel cleaner, safer, and more intentional. Enhanced Display Features to Elevate PresentationBeyond protection, acrylic display cases can be designed to improve how the item is experienced visually. LED lighting—top-lit, side-lit, or built into the base—can bring out texture, edges, and color that standard room lighting tends to flatten, especially on reflective pieces like jewelry, watches, and glossy models. It also helps create a more premium, “display-ready” look without needing a complicated setup. For pieces meant to be appreciated from every angle, rotating platforms or 360° display options make viewing easier while reducing the temptation to pick the item up. Presentation upgrades like mirrored bases, colored base panels, or contrast backdrops can add depth and separation, helping the item stand out more clearly in the case. They’re small details, but they often make the difference between an item that’s simply stored and one that’s truly showcased. Acrylic Display Case Boxes Common Applications1.Retail DisplaysIn retail, acrylic display case boxes are a go-to for jewelry, electronics, and collectibles because they keep items front-and-center while adding a clear layer of protection. They help cut down on dust and constant touching, and they work especially well on countertops or as freestanding displays—where you need something that looks polished but can still handle a busy store environment. 2.Museums and GalleriesIn museums and galleries, acrylic cases protect artifacts, fossils, and artwork without visually “boxing in” the exhibit. They maintain clean sightlines for visitors while helping guard against accidental contact, dust, and everyday exposure in high-traffic spaces—so the display stays both accessible and protected. 3.Offices and HomesAt home or in the office, acrylic display case boxes make it easy to keep trophies, certificates, memorabilia, and collections neat and well-protected. They reduce dust buildup, limit accidental bumps or fingerprints, and give items a dedicated place—so the display feels intentional without making the space look cluttered. Read more:https://www.gdxflin.com/blog/how-thick-should-acrylic-be-for-a-display-case.htmlhttps://www.gdxflin.com/blog/acrylic-vs-glass-which-is-better-for-your-project.html https://www.gdxflin.com/blog/why-are-acrylic-display-cases-so-expensive.html ConclusionIf you’re choosing a case, focus on your space, your item’s needs, and how the display will be used day to day—the best case is the one that still looks great after the “new” feeling wears off.
December 23, 2025
How Thick Should Acrylic Be for a Display Case?
In this guide, we’ll break down how acrylic sheet thickness is measured (and why tolerances matter), what to consider when choosing thickness for an acrylic display case, the most common thickness options and where they work best, and how laser cutting vs. CNC changes the thickness decision. Acrylic Sheet Thickness Explained: How to Read Specs and Tolerances1.How Thickness Tolerance Affects Fit and HardwareAcrylic sheets aren’t perfectly uniform, and those “tiny” thickness differences can become surprisingly noticeable once the case is assembled. When you’re aiming for tight seams, even door gaps, or a satisfying magnetic close, tolerance is often what separates a case that feels precise from one that feels slightly off. Just a small change in thickness can nudge panels out of alignment, widen or tighten door clearances, and shift magnet contact points—so the door might snap shut cleanly in one spot but rub or feel misaligned in another. 2.Nominal vs. Actual Thickness—How to Check Before You BuildWhat to checkWhy it mattersQuick tipNominal (labeled) thicknessWhat your design is based onConfirm what thickness the supplier lists (e.g., 3mm, 5mm) before quoting or drawingSupplier tolerance rangeTells you how much the sheet can varyAsk for the tolerance spec (e.g., ±0.1mm / ±0.2mm) before finalizing tight fitsActual thickness (measured)The real number your parts must fitUse calipers and measure multiple spots on the sheet, not just one cornerCritical clearance areas (slots, doors, magnets)Small differences can cause rubbing, gaps, or misalignmentLeave a small buffer for slot-fit parts and magnetic doors—avoid “zero clearance” designsConsistency across batchesDifferent batches may behave differentlyIf you reorder later, re-check thickness—don’t assume it matches the last batch Factors to Consider When Choosing Acrylic Display Case Thickness1.Case Size and SpanThickness is what keeps an acrylic display case box from feeling flimsy. As the largest panel gets longer—usually the top or the longest side—it’s more likely to bow and can feel slightly “springy” to the touch. Thin acrylic may look fine at first, but over time a long span can start to show subtle waviness, so larger cases typically need thicker sheets or a more supportive structure to stay crisp. 2.Load-Bearing NeedsIt’s not just the walls that matter—it’s whatever is carrying the weight inside the acrylic display case. If the base is holding a heavier item, or you’re adding shelves/tiers, stiffness becomes the priority. Thinner bases can slowly sag and shelves can dip under load, which is why the parts that actually support weight often need to be thicker (or reinforced) than the side panels. 3.Doors and OpeningsOnce you add a door, small alignment issues become much easier to notice on an acrylic display case. Magnetic doors and hinged doors depend on consistent spacing and a stable mounting surface; if a panel flexes, gaps shift and the close can feel uneven. Using thicker acrylic helps the door stay flatter, keeps margins more consistent, and gives magnets or hinges a sturdier anchor—so everything feels smoother and more “finished.” 4.Shipping, Handling, and StackingIf the acrylic display case will be shipped, moved, or stacked, thickness starts working as protection too. Thicker acrylic handles corner stress, compression, and minor impacts better during transit. And when cases are stacked, pressure concentrates at contact points—so extra thickness, or added reinforcement, reduces the chance of warping, stress marks, or cracking over time. 5.Visual Look and FeelThickness also changes the overall presence of a large acrylic display case. Thicker panels tend to look and feel more premium—steadier on the shelf, more rigid in the hand, and visually “substantial.” The tradeoff is optical: thicker edges can create stronger refraction and reflections under certain lighting, so if you’re after a clean, minimal look, it’s worth considering thickness and lighting together. Common Acrylic Thicknesses and Applications for a Display Acrylic CaseAcrylic Display Case ThicknessBest ForTypical Use Cases2mm / 3mmSmall, lightweight, dust protectionSmall collectibles, mini figures, simple covers, light-duty display boxes4mm / 5mmMid-size cases, better rigidity, more premium feelStandard display cases, sneaker/figure cases, stackable units, cases with simple doors6mm / 8mm+Large cases, long spans, higher load/anti-bendingLarge acrylic display boxes, long panels, heavier items, load-bearing bases/shelves, premium builds Laser Cutting Acrylic Display Case Boxes: Picking the Right Sheet Thickness1.Typical Thickness Range for Laser CuttingLaser cutting works best when it can slice through acrylic cleanly without overheating the sheet. The “easy” thickness range isn’t one-size-fits-all—it depends on laser power, lens setup, air assist, focus accuracy, and how consistent the shop’s settings are from sheet to sheet. Thin material usually cuts fast and leaves a smooth edge because heat doesn’t have time to spread. As the sheet gets thicker, speeds slow down and the margin for error shrinks, which is why—especially if you’re producing an acrylic display case in batches—it’s smarter to choose a thickness your fabricator can repeat reliably, not just something that worked once on a perfect test. 2.What Happens When You Laser-Cut Thick AcrylicWith thicker acrylic, heat stays in the cut zone longer, so edge quality becomes harder to keep “showroom clean.” You may see a faint warm tint, light melt texture, or more noticeable taper because the beam behaves differently through the full depth of the sheet. Heat can also leave internal stress that isn’t obvious at first, but later shows up as hairline cracking around sharp inside corners, small holes, or tight slots. Two simple design habits help a lot: use small inside radii instead of sharp corners, and keep delicate features a bit away from edges where stress concentrates. 3.Precision and Assembly: Leave Room for KerfKerf is tiny, but it decides whether parts assemble smoothly or fight you. In tab-and-slot or friction-fit designs, a “perfect” CAD slot can end up too tight after cutting—especially when sheet thickness varies slightly across a batch. A better approach is to design in a little clearance, then dial it in with a quick test cut using the same acrylic and the same machine settings. For an acrylic display case with doors, magnets, or interlocking panels, aiming for a controlled, comfortable fit (instead of forcing a press-fit) also helps prevent whitening, stress lines, and cracks over time. 4.When CNC Is the Better ChoiceCNC is often the better choice when you’re working with thicker sheets, tighter tolerances, or parts that need to work as well as they look. It’s well-suited for pockets, rebates, clean slot geometry, countersunk holes, and structural components—and it avoids many of the heat-related side effects that can show up in thick laser cutting. At Symphony Acrylic, our CNC machining accuracy typically reaches ±0.05 mm to ±0.1 mm, which helps keep fit and alignment consistent from part to part. That precision matters most in load-bearing panels, hardware mounting areas, and premium acrylic display case boxes where clean assembly, flush edges, and smooth door operation are part of the expected finish. CNC may take longer per piece, but the payoff is usually a cleaner build and more dependable results. ConclusionChoosing the right thickness is really about balancing span, load, hardware, and real-world handling. For smaller cases, thinner sheets may be enough; as size, weight, doors, and shipping demands increase, thicker acrylic—or a smarter structure—quickly becomes worth it. And when precision features or thicker material are involved, CNC can deliver more predictable fit and finish. If you’re planning a custom build, Symphony Acrylic can help you select the right thickness and fabrication method based on your dimensions and use case—so your case looks sharp, assembles cleanly, and stays stable over time.
December 19, 2025
Acrylic vs. Glass: Which Is Better for Your Project?
In this guide, we’ll break down the key differences between acrylic and glass in a clear, practical way—from safety and weight to clarity, scratch resistance, heat performance, and customization—so you can confidently pick the best option for your project or display case. Acrylic vs. Glass Quick ComparisonFeatureAcrylicGlassImpact / SafetyShatter-resistant, safer on impactCan shatter into sharp piecesWeightMuch lighterHeavierClarityVery good (museum-grade is close)Crisp, high clarityScratch ResistanceScratches more easily (coatings can help)More scratch-resistantHeat ResistanceLower (can warp with heat)Higher heat stability What Is Acrylic? Acrylic—also known as PMMA—is a clear plastic often called “plastic glass” because it delivers a similar transparent look, but with very different performance in real use. It’s much lighter than glass and far less likely to shatter, which is why it’s widely used in places where safety matters. Acrylic is also easy to work with: it can be cut, bent, and shaped without the complexity that glass usually requires, making it a strong choice for custom designs and large panels. Some acrylic grades even offer UV filtering to help protect artwork or products from light exposure. The main tradeoff is the surface—acrylic can scratch more easily than glass, but with the right coatings and gentle cleaning habits, it can stay clear and polished for a long time. What Is Glass? Glass is a silica-based material most people know in its everyday form as soda-lime glass, with tempered and laminated versions often chosen when added safety is important. It’s valued for its sharp, crisp clarity, a hard surface that resists scratching, and strong heat and sun stability—which is why it remains a classic choice for windows and other long-term, high-wear applications. The main tradeoffs are weight and how it fails: glass is heavier than acrylic, and standard glass can break into sharp shards. Tempered glass is engineered to break into smaller, less hazardous pieces, while laminated glass includes an inner layer that helps keep the panel together if it cracks. Side-by-Side Comparison: Acrylic vs. Glass Impact / SafetyFor an acrylic display case, safety is often the biggest advantage. Acrylic is far less likely to shatter, and if something goes wrong it typically cracks rather than breaking into sharp pieces. A glass display case can be safe too, but in practice that usually means tempered or laminated glass—both of which add weight and cost. For public spaces or homes with kids/pets, acrylic is often chosen simply because accidents are easier to manage. WeightAcrylic is significantly lighter, which matters if you’re using a larger case, stacking units, mounting a display, or shipping frequently. A glass display case feels more substantial, but that added weight can require sturdier shelves, stronger frames, and more careful handling during transport and setup. Weight also affects shipping costs and the risk of damage in transit—heavier glass tends to demand stronger packaging and more cautious handling. Clarity & GlareGlass usually delivers the cleanest, most “crisp” view with minimal visual distortion—one reason it’s a classic for premium displays. Acrylic can still look excellent, especially in higher-grade sheets, but depending on thickness and lighting, an acrylic display case may show slightly more glare or optical effects at certain angles. If your display lighting is strong, adding anti-reflective film or adjusting the light position can make a noticeable difference with either material. Scratch ResistanceThis is where glass wins. A glass display case holds up better to daily wiping and general wear because the surface is harder. Acrylic scratches more easily, though good habits (soft microfiber cloths, non-abrasive cleaners) and optional coatings can help keep an acrylic display case looking polished. In practical terms, acrylic is often best when you can minimize frequent wiping—or when you can accept light surface wear over time. Heat ResistanceGlass is the more stable option near heat—it won’t soften or warp the way plastics can. Acrylic is more sensitive, so it’s not ideal near heaters, stoves, or other high-heat sources. If your display will sit in a warmer environment, a glass display case is usually the safer bet. Acrylic is still perfectly fine in normal indoor conditions, but prolonged heat exposure is where it’s most likely to show issues. UV / WeatheringMany acrylic sheets can be selected with UV-filtering in mind, which is useful when you’re protecting prints, collectibles, or products that fade. That said, for long-term exposure, UV-stabilized grades matter. Glass handles sunlight well, and UV control typically comes from coatings, films, or specialized glazing depending on the application. If your display sits near a sunny window, choosing UV protection up front can preserve colors and reduce aging of the item inside. Fabrication & CustomizationIf you need a custom look, acrylic is typically easier to work with. A display acrylic case can be cut, drilled, bent, and shaped into more unique designs without the same limitations. Glass can be customized too, but more complex shaping is harder, and lead times and costs often climb faster. Acrylic also makes it easier to add practical details—like cable pass-throughs, vents, or stepped bases—without compromising the overall design. Cost ConsiderationsPricing depends on size, thickness, safety requirements, and finishing. Acrylic can be more cost-effective for large, lightweight builds or custom shapes, while glass often delivers stronger long-term value when scratch resistance and heat stability are priorities. At the high end, both an acrylic display case and a glass display case can become premium products once you add thicker panels, coatings, and higher finishing standards. One more thing to factor in: installation and shipping—acrylic can be cheaper to move and mount, while glass may cost more upfront but stay looking “new” longer in high-touch environments. When to Choose an Acrylic Display Case When safety matters mostIf the display will sit in a kids’ room, a school, a retail aisle, or any space where it could be bumped, a display acrylic case is often the safer option. Acrylic is much less likely to shatter, so everyday knocks are less likely to create sharp, dangerous debris. When weight is a real constraintFor larger cases, stacked setups, wall-mounted displays, or anything you’ll move or ship, weight quickly becomes a practical issue. Acrylic keeps the build lighter, which reduces stress on shelves and brackets—and makes packing, carrying, and transport far easier. When the design needs more than straight panelsIf your case requires curves, stepped tiers, tight openings, cable pass-throughs, or other functional details, acrylic gives you more flexibility. It can be cut, drilled, and formed more easily, so you can get a large acrylic display case that fits both the item and the way you want to use it—not just a standard box. When light protection is part of the goalFor artwork, prints, collectibles, or products that can fade, UV-filtering acrylic can help reduce light-related damage while still keeping the display clean and clear. It’s especially useful in bright rooms, storefronts, or near-window setups. When you’re scaling up size or coverageFor oversized displays or large installations, acrylic often becomes the more workable choice. It’s simpler to handle and install at scale, and depending on thickness and finishing, it can deliver a premium look with fewer logistical headaches than glass. When to Choose a Glass Display Case When scratch resistance needs to hold up long-termIf you’ll be wiping the surface often or the case will see regular contact, a glass display case usually stays looking “new” longer. Glass is harder, so it’s less likely to pick up the fine swirls and light marks that can slowly build up in busy spaces. When the space is hot, bright, or sun-facingGlass handles heat and long hours of sunlight more comfortably than acrylic. If your display sits near a window, under strong lighting, or in a warmer room, glass is less likely to change over time, which makes it a reliable choice for fixed setups.When you want the cleanest, most natural viewIf your goal is for the case to “disappear” and let the item be the focus, glass is hard to beat. It typically delivers the crispest, most neutral clarity, which is why it’s often preferred for premium displays and window-style viewing. When it’s a permanent, high-traffic installationFor setups that will stay in one place—especially in retail or public environments—glass tends to be the more low-fuss option. It tolerates frequent cleaning and daily use well, making it a solid fit for long-term installations.When moisture or chemicals are part of the environmentFor aquariums, humid areas, or settings that involve frequent cleaning products or chemical exposure, glass often has the advantage. It’s stable, resistant, and generally more predictable in demanding conditions. ConclusionThere’s no single “best” choice—only the best fit for your situation. If you want something lighter, safer, and easier to customize, acrylic is often the smarter route. If your priority is scratch resistance, heat stability, and the crispest long-term clarity, glass usually wins. Use your environment and usage habits as the deciding factor, and you’ll end up with a display that not only looks right on day one, but still looks great years later.
December 17, 2025
Why Are Acrylic Display Cases So Expensive?
If you’ve ever shopped for an acrylic display case and felt a bit of sticker shock, you’re not alone. At first glance, it can look like “just a clear box”—but the price reflects far more than the material itself. From the quality of the acrylic sheet and the precision of CNC cutting, to finishing, bonding, inspection, customization, and even shipping protection, every step affects how clear, square, and durable the final case will be.In this article, we’ll break down the real cost drivers behind an acrylic display case—so you know exactly what you’re paying for and can choose the right one with confidence. The Material: Acrylic Acrylic (PMMA) isn’t the “cheap plastic” people often assume it is. The acrylic used in premium display cases is chosen for clearer optics and longer-lasting performance—higher-grade sheets look less cloudy, distort the view less, and keep collectibles looking sharp from every angle. It’s also typically more consistent in thickness, which makes it much easier to achieve tight seams, clean corners, and a case that sits perfectly square. Add better UV stability (so it’s less likely to yellow over time) and strong impact resistance compared with glass at similar thickness, and the price starts to make sense: that “museum-quality” look begins with the material, and better sheet stock simply costs more. Acrylic Display Case Box Production Process Acrylic display case box rarely come out of a mold in one quick cycle. Most are fabricated from flat sheets, which means every box is the result of several precise, hands-on steps—and that’s where a lot of the cost lives. The work typically begins with laser or CNC cutting to lock in dimensions; on our CNC line, machining accuracy can reach ±0.05 mm to ±0.1 mm, helping panels align neatly and keeping corners crisp and square. After cutting, edges are polished (and in some cases flame-finished) to achieve that clean, glass-like look. If the design calls for wrapped edges or shaped details, the acrylic must be heat-formed with careful control. The final assembly is done with acrylic cement, a process that looks simple but is extremely technique-dependent—small errors can show up immediately as haze, bubbles, stress marks, or seams that don’t match. To keep results consistent, our custom workflow follows a clear sequence: we start by confirming the design and specs, then move into cutting and surface/edge finishing based on the approved drawing. Next comes any required machining or optional branding details, followed by heat forming when the structure needs it. Once assembled, each piece is checked for fit and appearance, then cleaned and packed with protection so it arrives clear, tight, and ready to display. Quality Control for Clear Acrylic Display Cases Acrylic may look simple, but it’s one of the least forgiving materials to finish well. With a clear acrylic display case, the same clarity that makes your collectibles pop also makes flaws impossible to hide—fine scratches, tiny edge chips, a bit of glue haze, or corners that are even slightly out of square can stand out immediately, especially under bright display lighting. That’s why a premium case isn’t truly “done” the moment it’s assembled; it has to be inspected carefully, and anything that doesn’t meet the standard gets corrected before it leaves the shop. At Symphony Acrylic, we build that mindset into our process. Every clear acrylic display case is checked before shipment against the confirmed specifications: we assess the sheet condition and overall appearance, verify key dimensions, review surface and edge finishing, and make sure the structure feels stable and precise. We also treat packaging as part of quality control—because even a perfect case can arrive imperfect if it isn’t protected properly. The goal is straightforward: it should arrive clear, clean, and ready to display the moment you open the box. Customization Options for Acrylic Cases for Display Customization is often the biggest reason an acrylic case for display costs more than you’d expect. Once you go beyond a standard size, it stops being an off-the-shelf item and becomes a build-to-spec piece made around your collectible and how you want it presented. That can mean tighter tolerances, a preferred opening style, cleaner seam placement, subtle branding, or practical details like cutouts and alignment features—each adding design work, setup time, and more careful fabrication. At Symphony Acrylic, we usually start from your drawing or a physical sample, then match the project with the right processes—precision machining for a clean fit, optional UV/silk-screen logo printing, and forming when shaped edges are needed—so the final case feels purpose-built and polished, not simply “close enough.” Transportation and Handling Even when raw acrylic isn’t the biggest cost, getting a finished case to your door often is. An acrylic display case box is lighter than glass, but it’s still large, rigid, and easy to scratch—so it can’t be shipped like an ordinary carton. To arrive looking “new,” it has to be packed like a surface-finish product, with enough protection to keep edges, corners, and panels spotless through sorting and transit. Collectors also highlight a practical issue that pushes freight costs up: these cases don’t fold or compress, so they take up a lot of space on a truck. In one Reddit thread, a commenter noted they “take up a lot of cubic meters” and that “shipping them is expensive”—and that space cost inevitably shows up in the final price.https://www.reddit.com/r/PokeInvesting/comments/10nfxu1/why_are_acrylic_boxes_so_expensives_it_just/ So part of what you’re paying for includes:Protective film, foam, and corner guards to prevent scratches and edge damageDimensional-weight / oversize charges (carriers often bill by space, not just weight)Higher transit risk and the built-in cost of replacements/returns when damage happens Acrylic Display Cases Environmental Considerations Acrylic isn’t automatically “eco-friendly,” and it’s worth being honest about that. Where a higher-quality acrylic display case box can make a more convincing argument is in how long it lasts: when the case stays clear, stays square, and doesn’t need replacing every year, you end up producing less waste over time. That durability usually comes from smarter material and build choices—UV-stable sheets that resist yellowing, thicker panels and cleaner bonding that help prevent cracking or warping, and designs that let you replace a door or panel if it gets damaged instead of scrapping the entire case. It’s not a perfect sustainability story, but “buy once, use longer” is often the most practical way to reduce impact. The Acrylic Display Case Box Value of Durability A well-made clear acrylic display case box is less about decoration and more about reliable protection. Acrylic generally handles everyday bumps better than glass at similar thickness, and when the structure is built with the right thickness and tight, consistent seams, it stays rigid and keeps its shape over time. In real-world use, that strength pays off in simple ways: less dust reaching your collectible, fewer scuffs from handling, and a cleaner, more consistent presentation year after year—especially when the material and finishing are chosen to age well under light. And when you’re protecting something valuable, the case often feels less like an optional add-on and more like a small, sensible form of insurance. How to Choose the Right Acrylic Display Case When choosing an acrylic display case, start with three basics: fit, clarity, and long-term stability. Leave a little breathing room inside so your item isn’t brushing the walls, then match the panel thickness to the size of the case—smaller displays can stay sleek, while larger cases usually need thicker acrylic to stay rigid and square. Next, look for the details that separate “okay” from “premium”: well-polished edges, seams that stay clear with minimal haze, and doors that sit flush and feel smooth if you’ll be opening them often. If the case will be near sunlight or strong display lighting, UV-stable material is a smart upgrade to help it stay clear over time. And finally, don’t overlook packaging—shipping is where most scratches and corner damage happen. If you’re going custom, Symphony Acrylic can work from your drawing or a physical sample and help you fine-tune the sizing, structure, and finishing choices, so the final case feels purpose-built for your display—not just “close enough.” ConclusionIn the end, acrylic display cases are expensive for the same reason premium collectibles deserve one: the details matter. Higher-grade acrylic, precise fabrication, strict quality control, thoughtful customization, and careful packaging all add cost—but they also add clarity, stability, and long-term protection. If you’re investing in something you want to keep pristine and display proudly, a well-made case isn’t just an accessory—it’s part of the protection plan. And if you need something tailored to your exact item, Symphony Acrylic can work from your drawing or sample to help you build a case that fits, looks right, and arrives display-ready.
December 11, 2025
How To Clean Acrylic Display Case
Acrylic display cases are a great way to show off figures, models, collectibles, or merchandise while keeping dust and fingerprints under control. But unlike glass, acrylic is softer and easier to scratch, which means it needs a different cleaning routine and gentler products. In this guide, we’ll walk through the essentials of keeping your acrylic display case clear and tidy—how it differs from glass, which cleaners to use (and avoid), how to clean it safely day to day, how to deal with light scratches and haze, and which habits can slowly damage the surface. Know Your Material: Acrylic vs Glass1.Key differences between acrylic display case box and glass casesAt first glance, an acrylic display case box and a glass case can look almost identical, but they behave very differently in everyday use. Acrylic is much lighter than glass, so it’s easier to lift, move, and place on shelves or inside cabinets without worrying too much about weight. It’s also more impact-resistant—if you bump it, acrylic is more likely to flex or crack, while glass is more likely to shatter into sharp pieces. The trade-off is durability on the surface. Acrylic is softer than glass, which means it can scratch more easily. A rough cloth, some trapped dust, or a harsh cleaner can all leave fine marks. Glass can usually handle stronger scrubbing and tougher cleaners, but an acrylic display case box needs a gentler approach if you want it to stay clear and glossy over the long term. 2.Why “normal glass cleaner” is a bad idea for acrylicMost everyday glass cleaners are made for real glass, not for plastics like acrylic. They often contain ammonia or other strong chemicals that can slowly damage acrylic. With repeated use, those ingredients can cause cloudiness, tiny stress cracks (crazing), or a permanently dull look on your clear acrylic display case. The tricky part is that this damage doesn’t always show up right away. After the first few cleanings, everything might look fine, so it’s easy to keep using the same product without thinking about it. To protect the surface, it’s better to avoid standard glass cleaner altogether and use mild soapy water or a cleaner specifically labeled as safe for acrylic or plastic. 3.How scratches and haze form on acrylic surfacesScratches and haze on an acrylic display case box usually come from two main things: friction and the wrong cleaning products. When you wipe a dusty surface with a dry paper towel or a rough cloth, the tiny dust particles act like fine sandpaper and get dragged across the acrylic. Over time, this creates swirl marks and a cloudy look instead of a sharp, clear finish. Harsh chemicals can make the problem worse. Strong solvents or aggressive cleaners can attack the top layer of the acrylic, leaving it streaked, matte, or uneven. That’s why the how matters as much as the what: soft microfiber cloths, gentle cleaners, and light pressure will help keep your clear acrylic display case clear, while careless cleaning slowly wears the surface down. What You’ll Need to Clean an Acrylic Display Case Box1.Safe cleaning suppliesWhen you’re cleaning an acrylic display case box, the golden rule is: be gentle. The surface can scratch or dull quite easily, so mild cleaners and soft cloths are always better than anything harsh or abrasive. A little mild dish soap or a cleaner specifically labeled safe for acrylic is usually all you need. Mix a small amount with water and you’ll be able to remove fingerprints, light dust, and everyday smudges without damaging the material. Use distilled or clean water both for mixing your solution and for rinsing. Distilled water is especially helpful if you have hard tap water, since it helps prevent mineral spots from forming as the case dries. For wiping, choose microfiber cloths. They’re soft, grab dust very well, and are much less likely to scratch the surface than paper towels or old T-shirts. To finish, keep a few soft, lint-free towels nearby for drying and gentle buffing. With light pressure, they’ll leave your acrylic display case looking clear and streak-free. For most day-to-day cleaning, this simple kit is more than enough. 2.Optional but helpful itemsA few extra tools can make the cleaning process smoother and help your clear acrylic display case stay clean for longer. An anti-static cleaner or spray made for plastics is especially useful. Acrylic tends to build up static, which attracts dust from the air. A quick anti-static treatment after cleaning can slow that down, so the case doesn’t look dusty again right away. Canned air or a hand air blower is great for blowing loose dust out of corners, seams, and around stands or risers. Getting the dust off this way, instead of wiping it across the surface, reduces the chance of creating fine scratches. A soft brush—like a camera lens brush or a clean makeup brush—is handy for gently cleaning edges, hardware, and tight spots where a cloth can’t reach easily. You don’t need all of these extras to keep an acrylic display case looking good, but they’re nice upgrades, especially if your case is large or has a lot of small details. 3.Products and tools to avoidKnowing what not to use is just as important as choosing the right supplies. Some everyday cleaners can slowly damage an acrylic display case box, even if they seem harmless at first. Avoid ammonia-based glass cleaners. They work well on real glass, but on acrylic they can cause cloudiness, surface damage, and tiny stress cracks that are very difficult to fix later. Skip paper towels, rough sponges, and magic erasers. They may feel soft in your hand, but they’re abrasive enough to leave fine scratches—especially when you’re wiping away dust. Stay away from alcohol, acetone, and other strong solvents. These can react with acrylic, leading to crazing (small fractures), softening of the surface, or a permanent haze. If you’re ever unsure about a product, test it first on a small, hidden area of the acrylic display case. If it dries without leaving marks, haze, or dull patches, it’s much more likely to be safe for regular use. Routine Cleaning for Your Clear Acrylic Display Case1.Step 1 – Remove items from the acrylic display box caseStart by emptying the acrylic display box case completely. Take out figures, models, stands, and any other accessories inside. This not only protects your collection from accidental bumps, but also gives you full access to every surface—walls, corners, and the underside of the lid or top panel—so you’re not trying to clean around fragile pieces. 2.Step 2 – Blow or brush off loose dust (no rubbing yet)Before you touch the acrylic with a cloth, clear away loose dust. Use canned air, a hand blower, or a very soft brush to gently lift dust off the panels and out of corners. The idea is to remove as much loose debris as possible first, so you’re not dragging tiny particles across the surface of the acrylic display case and accidentally creating fine scratches. 3.Step 3 – Mix a mild soap-and-water solutionNext, mix up a gentle cleaning solution. Fill a small bowl or spray bottle with clean or distilled water, then add a single drop of mild dish soap. You’re aiming for a light, slightly soapy mix—not a lot of foam. That’s usually enough to loosen fingerprints and light grime without being harsh on the acrylic. This simple combination—distilled water, a tiny bit of dish soap, and a microfiber cloth—is very similar to what museum and collections staff mention in Reddit discussions when they talk about cleaning acrylic box cases and plexiglass panels. It’s a low-risk, reliable routine that keeps display surfaces clear without damaging them. If you want to know aout this reddit,you can click it:https://www.reddit.com/r/MuseumPros/comments/pjq3zc/cleaning_acrylic_cases/ 4.Step 4 – Wipe with a damp microfiber clothDip a microfiber cloth into your solution (or lightly mist it with a spray bottle), then wring it out so it’s damp rather than dripping. Wipe the clear acrylic display case using light pressure and long, straight strokes. Avoid scrubbing hard or using tight circular motions, as those can leave visible swirl marks when the light hits the surface. Work in a steady order—usually the inside surfaces first, then the outside—so you don’t miss any areas or accidentally touch spots you’ve already cleaned. 5.Step 5 – Rinse with clean water and dryAfter you’ve loosened and wiped away the dirt and fingerprints, switch to a second cloth dampened with clean water to remove any remaining soap. This helps prevent streaks and residue from drying on the acrylic. Then gently dry all the panels with a dry microfiber cloth or a soft, lint-free towel. Make sure you dry both the interior and exterior surfaces so water spots don’t form. When you’re done, the acrylic display case box should look clear and even, without obvious streaks or dull patches. 6.Step 6 – Optional anti-static treatmentIf your clear acrylic display case seems to attract dust almost immediately after you clean it, an anti-static treatment can make a noticeable difference. Use an anti-static spray or cleaner that’s safe for plastics and apply it with a clean cloth, following the product instructions. It won’t eliminate dust completely, but it can slow down buildup so you don’t need to clean as often—especially helpful in dry rooms or dusty environments where static is a constant issue. Dealing With Light Scratches and Haze1.Identifying what can be fixedNot every mark on your acrylic display case needs the same level of treatment. Light swirl marks, small scuffs, and a slight haze on the surface are often good candidates for polishing and can usually be improved noticeably. Deep gouges, cracks, or chips are different—they’re much harder to repair and may never disappear completely. A simple way to judge the damage is the fingernail test. Gently run your nail across the scratch: If you can barely feel it, there’s a good chance you can improve it at home. If your nail clearly catches, the scratch is likely too deep for basic polishing to fully remove. 2.Using plastic or acrylic scratch removerFor light surface damage, a plastic or acrylic scratch remover (or a dedicated plastic polish) is a great place to start. These products are designed to soften and reduce the appearance of fine scratches rather than strip the material. Apply a small amount to the scratched area—either directly or on a soft cloth—following the instructions on the label. Start with a thin layer and only add more if you need it; a little usually goes a long way on an acrylic display case box. 3.Hand-polishing method with microfiber and polishing compoundTake a clean microfiber cloth and gently work the polishing compound over the scratch using small overlapping circles or short back-and-forth motions. Use light to moderate pressure and pause regularly to check how things are progressing. As you polish, the scratch should gradually soften and blend in better with the surrounding acrylic. The aim isn’t to grind the surface away, but to smooth the edges of the scratch so it’s less noticeable. When you finish a pass, wipe off any residue with a fresh cloth and inspect the area under good lighting. If the mark has improved but is still visible, you can repeat the process once or twice, as long as you stay gentle and don’t press too hard. This slow, controlled approach can make your acrylic display case look much better without thinning the panel. 4.When to stopIf, after a few careful rounds of polishing, the scratch still looks almost the same—or if it clearly catches your fingernail from the beginning—it’s probably too deep to fully fix with home methods. At that point, pushing harder or polishing for too long can thin the surrounding area and leave dips or waves in the surface. In that situation, it’s usually wiser to accept a small imperfection than risk distorting the panel. The upside is that once the rest of the acrylic display box case is clean and clear, most minor scratches fade into the background and are rarely noticed in normal use. What NOT to Do to an Acrylic Display Case1.Don’t use household glass cleaner on acrylicMany common glass cleaners are formulated for real glass and often contain ammonia or other strong chemicals. On an acrylic display case, those ingredients can slowly cause haze, tiny cracks, and a dull, tired-looking surface. It might seem fine the first few times, but long-term use can seriously damage the material. 2.Don’t scrub with paper towels or abrasive padsPaper towels, rough sponges, and scouring pads are more abrasive than they appear. On acrylic—especially when there’s dust on the surface—they can leave a web of fine scratches. Magic erasers are even more aggressive. For anything involving an acrylic display box case, stick to microfiber cloths or other products marked as safe for delicate surfaces. They lift dust and dirt without grinding it into the panel. 3.Don’t use strong solvents, alcohol, or acetonePowerful solvents like acetone, lacquer thinner, and many strong alcohol-based cleaners can react with acrylic. The result can be crazing (tiny fractures), cloudy patches, or even softened, misshapen areas where the surface has been partially melted. A simple rule of thumb: if a cleaner is advertised for stripping paint, dissolving glue, or heavy-duty degreasing, it doesn’t belong anywhere near your acrylic display case. 4.Don’t clean in direct sun or high heatCleaning an acrylic display case in direct sunlight or in a very warm spot can cause your cleaner to dry too quickly, leaving streaks, spots, and uneven patches that are hard to remove. In extreme heat, thinner acrylic panels can even warp slightly. For the best results, clean the case indoors, out of direct sun, at a comfortable room temperature. That gives you enough time to wipe, rinse, and dry the acrylic evenly before anything dries on the surface. ConclusionKeeping an acrylic display case looking good isn’t difficult, but it does require a bit of care: gentle cleaners, soft cloths, and the patience not to “scrub like glass.” By understanding how acrylic differs from glass, choosing the right products, following a simple routine for dust and fingerprints, and treating scratches carefully, you can keep the panels clear without slowly wearing them down.